Posts

Showing posts from 2011

Access SharePoint list item attachements through code

The code to access the list item attachements is a really simple code. The attachments of a list item are stored as a collection of files for each list item. This collection can be access through the Attachments property of the SPListItem object. An example code is shown below. //   get a reference to the attachments collection SPAttachmentCollection attachments = listItem.Attachments; // loop through each file in the collection foreach (SPFile in attachments) {     // your logic }

Update web part properties programatically

Image
Earlier in MOSS 2007, we used SPWebPartCollection objects to modify the web part properties through code. But now it is obsolete. Now we have a new class called SPLimitedWebPartManager which we can use to do the same thing. I have created a Visual web part with a button. On click of this button, we will make a page viewer web part show the www.google.com  page. Below shown is the code The code will loop through all the web parts in the page where this web part is added and check for a web part with title Page Viewer. When a match is found, it will update the ContentLink property of it and reload the page for the changes to be observed. You can use the above code for any web part by casting it to an appropriate type

The local farm is not accessible

Sometimes you might encounter an error as The local farm is not accessible. Cmdlets with FeatureDependencyId are not registered when you try to open Power Shell To resolve it check the following. The SQL Server is up and running The SQL Server is accessible from the machine where you have opened the Power Shell (applicable in a farm environment) The account used to open the Power Shell has db_owner access on the SharePoint_Config database. Logging in as the system account and starting the power shell should resolve the issue if the SQL Server is accessible.

Create web part pages with custom layouts in SharePoint 2010

Image
SharePoint provides web part pages with eight layouts by default. Unfortunately the process of creating web part pages with custom layouts is a little complex. In this post i will show you how you can create web part pages with custom layouts. I have created a component which will deploy an application page which can be used to achieve this. Go to http://archive.msdn.microsoft.com/customspcf  and download the wsp file with the name CustomSPCF.wsp Deploy the solution. This will deploy an application page at /_layouts/customspcf/customspcf.aspx It will add four web part page layouts at 14\Template\1033\Sts\Doctemp\Smartpgs\CustomSPCF\ and four images corresponding to the layout at 14\Template\Images\CustomSPCF\ The below image shows how the application page will look like You can customize the application page and replace the deployed custom layouts or add new layouts. Follow the below steps to replace the exisitng layouts. 1. Go to the applciation page at 14\Templates\L

Information Management Policy settings in SharePoint 2010

Image
Often you will come across situations where you have to do something with your documents after a certain period of time after they have been created/modified. Information Management Policy settings is where you can configure it. Go to you document library or list settings and click on Information Management Policy Settings Select the content type for which you want the settings to be applied. This screen will show you all the content types you have enabled for your list or library. For a document library you will see Document and Folder where as for a list you will see Item and Folder by default.  Click on Document. In the next screen you will see a list of settings that you can configure like enabling Retention, Labels and Barcodes. But we will only concentrate on the Retention part in this post. Select Enable Retention . This will show another link called Add Retention Stage Clicking on Add a Retention Stage will show a pop up. In the pop you can select when the configur

Create Site Collections from Web Template in SharePoint 2010

Image
I happened to work on a project where we had to create site collection based on the web templates. In SharePoint 2010, when you save a site as template, it is saved as a sandbox solution. But as we know, sandbox solutions are site collection scoped. So we will see how we can deploy one of these at the farm level and create site collections using the web template. First we will create a site based on the Team site template, make some changes and save it as template. I have customized the home page a little to make it look different from the default team site template. Now go to Site Settings and click on Save site as template This will save the template to the solution gallery of the site collection Click on the solution gallery link in the success dialog. Use the open with explorer feature and copy the wsp. Open the solution using Visual Studio 2010 now. Create a new SharePoint project of type Import SharePoint Solution and select Deploy as a Farm Solution. Select the

Site Recycle Bin in SharePoint 2010 SP1

Image
SharePoint 2010 SP1 has brought with it an amazing feature using which site collections administrators can restore sites and subsites which were accidentally deleted. Before SP1 we had to go through a painful process of restoring the database from a backup. But the admin can simply go to the second level recycle bin and select the subsite that was deleted and restore it just like any other content inside the recycle bin. In the above picture Sub is the name of the subsite that was deleted. The site collection administrator can see this in the recycle bin. He can select it, click on Restore Selection and the site is back. Very simple process, isn't it ??

Storage Management in SharePoint 2010 SP1

Image
SharePoint 2010 Sp1 has brought some great enhancements to the SharePoint product. One of those is the Storage Management feature. This page is located at /_layouts/Storman.aspx You can go to this page from SiteSettings->StorageManagement Using this you can monitor 1. All the folders in your site and the amount of space they are using. 2. Percentage of size occupied in the total contents of its parent folder. 3. Percentage of size occupied in the total size of the site. You can even click on an individual folder to open the contents in it and check the data for the files and sub folders inside the folder. Indeed a very useful feature for sites with large amounts of content.

Managed Accounts in SharePoint 2010

Image
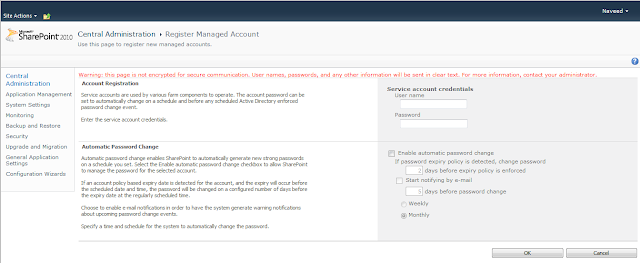
SharePoint 2010 introduced a new concept called Managed Accounts. Now in SharePoint 2010, administrators can register a managed account which will be used by the farm or specific web applications. The advantage of using the Managed account is that 1. Managing the account is easier. Can be done at one place using Central Admin. 2. Password changes can be automated. 3. Emails can be sent when the password is about to expire. To register a new managed account, go to central admin->Security->Configrue Managed Accounts The admin can specify the settings and register a new managed account using the above UI. Next time a new web application is created, the admin can select this managed account instead of typing the id and password for the service account. So when the password has to be changed for the managed account, the admin can go to the list of managed accounts, edit it and change the password. Even better, the admin can configure automatic password change for this manag

SharePoint 2010 SP1 improvements

Microsoft released the first service pack for SharePoint 2010 recently. Some of the improvements in the SharePoint Server SP1 are listed below 1. Support for IE9 2. Better crawl performance for search 3. Improved storage management - lets you monitor the storage for the folders in your site collection 4. Recycle Bin which will retain the deleted site collections. Site collections deleted by mistake can easily be recovered using this feature. 5. Support for SQL Server 2011.

Use XSLT to hide columns in SharePoint list forms

Image
In this post i will explain how XSLT can be used to hide the list columns in forms for users with insufficient previleges. After you open your site and the list in SharePoint designer, create custom forms for New, Edit and Display forms. Open each of the forms and select the column which should be shown based on user permissions. Expand the Conditional Formatting option on the ribbon and select Show Content. In the next screen click on Advanced. In the pop up that appears after that, search for the function called IfHasRights This function will determine whether the current user has the rights specified and will do the formatting accordingly, based on the result. The permission mask specified is determined as the sum of the permission masks for the permissions required. Below mentioned are the permission masks for the permissions. ViewListItems - 1 AddListItems - 2 EditListItems - 4 DeleteListItems - 8 ApproveItems - 16 OpenItems - 32 ViewVersions - 64 DeleteVersi

SharePoint list forms display HTML instead of rendering

Image
I have recently come across a problem where a custom list form i created using SharePoint designer was displaying the HTML directly instead of rendering it. As shown above the HTML for the Assigned To column value is not being rendered. To overcome this you just have to add a simple property to you XSLT. Select the HTML that is displayed and go to the code view. You will see the statement as <xsl:value-of select="@Assigned TO"></xsl:value-of> To this you have to add a parameter called display-output-escaping <xsl:value-of select="@Assigned TO" display-output-escaping="yes"></xsl:value-of> As you can see, this time the HTML is rendered properly.

Unable to load assembly group - Sandbox solution

I ran into an error lately when i tried to add a web part which i created as a Sandbox Solution. It said Unable to load assembly group. The user assembly group provider threw an exception while trying to provide user assemblies for the specified assembly group To resolve it follow the below steps 1. Go to services.msc 2. Check the service account for "SharePoint 2010 User Code Host service" 3. Change it to a domain account or probably to the farm account.

URL fields in SharePoint Content Query Web Part

Image
When a content query web part is used to query and display the items in the Links list, i got the output in a very undesirable format. As you can see in the image above, it is showing the URL of the link followed by a comma and then the link text. Also when you click on the link in will take you to the display form for that item in the links list instead of taking us directly to the URL of the link. So i started to modify the XSL to get the desired bahaviour which is It should show only the link text without the URL The hyperlink should point to the URL rather that the display form for that item. For this go to your site's Style Lirrary->XSL Style Sheets Download a copy of the ItemStyle.xsl I named the copy as CategoryItemStyle.xsl. Modify the content of it to this Upload the CategoryItemStyle.xsl to the Style library-> XSL Style Sheets. Then export the default the Content Query Web Part and open in it in notepad or Visual Studio Change the ItemXslLink prope

Remove hyperlink for lookup columns in SharePoint

Image
I tried to look for how to remove the hyperlink for the lookup columns in SharePoint. I was expecting some kind of an XSL transformation. But all the posts i found in the internet were using JavaScript for this functionality.  So i decided to work on the XSLT myself. I know this is a much cleaner and efficient solution. And this is how it is done. I have a list with a lookup column called "DeptLookup". To remove the hyperlink follow the below mentioned steps Open this list in SharePoint designer. Click on the AllItems.aspx to open it. Select the lookup column Click on the formula on the ribbon This will open a dialog for you called Insert formula The default formula for the lookup column is $thisNode/@*[name()=current()/@Name] Change it to substring-before(substring-after($thisNode/@*[name()=current()/@Name],'>'),'<') Click on OK and save the changes. Now when you go to the list, you will see the lookup values without the hyperlinks.

SharePoint Edit Page and Personalize page using Javascript

I had to dig deep to find out what are the javascript functions called when we click the Edit Page button the SharePoint ribbon. I had to hide the ribbon for one of my client's requirements and i had to provide links for Edit Page, Personalize page and Save page. I have used three hyperlinks for each of these functionalities. This is how we can do it in SharePoint. <a href="javascript:ChangeLayoutMode(false);">Edit</a> <a href="javascript:ChangeLayoutMode(true);">Personalize</a> <a href="javascript:ChangeLayoutMode(null,true);">Save</a> These functions are available in a Javascript file which SharePoint includes by default. So you just have to place this html on your page and there you go.

Config file for SharePoint custom timer jobs

Image
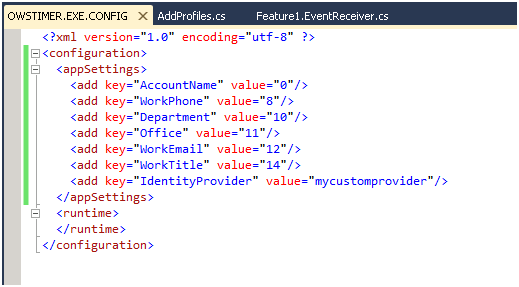
SharePoint timer jobs run under the OWSTIMER.exe process. This process has a configuration file associated with it. We can use this config file to specify the configuration settings that are to be used in custom timer jobs. Open the OWSTIMER.EXE.CONFIG and add the <appSettings> tag to it. Then add your key value pairs under this appSettings tag For this you have to add a reference to System.Configuration Then you can use the  System.Configuration. ConfigurationManager .AppSettings[ key ]  to retrieve the values for a key from the config file. Example:  string dept = System.Configuration. ConfigurationManager .AppSettings[ "Department" ];

Create User Profiles using SharePoint Object Model

In this post i will show you how you can use the SharePoint object model to create User Profiles programmatically. For the code to work make sure you have a User Profile Service application created and associated to your web application. You have to add references to two assemblies which will be available in the 14 hive/ISAPI Microsoft.Office.Server Microsoft.Office.Server.UserProfiles You have to get the ServiceContext first and then get the UserProfileManager from the service context. The UserProfileManager provides ways to add and edit profile to your SharePoint. string  socialDataStatsSite = "http://servename:port/" ; using ( SPSite siteColl = new SPSite (socialDataStatsSite)) { SPServiceContext serviceContext = SPServiceContext .GetContext(siteColl); UserProfileManager userProfileManager = new UserProfileManager (serviceContext); UserProfile profile = null ; bool existingUser = userProfileManager.UserExists(AccountName); if (existingUser) { profile = userPr

Windows 7/Windows Server 2008 R2 SP1 released

Microsoft has released the Service Pack -1 for Windows 7 and Windows Server 2008 R2. The main feature in Windows Server 2008 R2 SP1 being the addition of RemoteFX. RemoteFX is a feature which enables rich user experience for Remote Desktop users. It enables rich interfaces with the utilization of GPU on the host. This means that remote desktop users can have a full blown Windows desktop experience remotely even from a thin client just as complex as a LCD display.The GPU on the server is shared among all the clients with the RemoteFX technology called VGPU(Virtual Graphical Processing Unit). The remote users can have all the rich experience of Sliverlight or 3D graphics from the client utilizing the VGPU. With the huge adoption of cloud by multiple organizations, Microsoft has yet again made a break through with RemoteFX by enabling the remote users to have rich User Experience which is the foremost requirement for an end user. With this great leap i expect more virtualization and mor

Handle Session Start for SharePoint 2010 applications

Image
I ran into a situation where i have to handle the session start of a SharePoint application. I dint find much information about it in the internet, so i decided to post one myself. There are two main steps for this. 1. Enable sessions for your SharePoint application 2. Handle the Session_Start event. To enable Sessions for SharePoint application, make the following changes in your web.config 1. Make enableSessionState= true 2. Replace the <httpModules/> with the below       <httpModules >            <add name="Session" type="System.Web.SessionState.SessionStateModule" />       </httpModules > 3. Add the Session module for your SharePoint site from the IIS Manager.     Open IIS Manager and expand sites.     Select your site and double click on Modules. Click on Add Managed Module on the right hand side Actions menu Give a name to the module and select the SessionStateModule from the drop down This will enable sessions for

Run Visual Studio 2010 as administrator

Image
To create SharePoint projects in Visual Studio, we need to run it as administrator. I find it cumbersome to right click on the icon and click on run as administrator. So i figured out a way to run the Visual Studio 2010 as administrator whenever it is started. For this go to properties on Visual Studio icon. Go to the Compatibility tab and check Run this program as administrator The next time you click on Visual Studio 2010 icon, it will run with the administrator privileges.

Using Resource files with SharePoint

Image
This post will explain how resource files can be used while creating visual web parts for SharePoint. For this i will create a project which will have a drop down with two languages English and French. It will also have a text box and label associated to it which asks for a name. When i select a language from the drop down, the text in the label will change according to the language selected. I will start off with creating a visual web part using Visual Studio 2010. The design view is shown below Then i will add two new resource files to this project, English.resx and French.resx Then i will add the key value pairs to the resource files. I will name the key as lblName and the value of it will be Name in the English resource file. In the French resource file, the key will remain the same lblName, but the value will be the french translation for name i. e Nom This is how the English.resx resource file looks like And this is how French.resx looks like I will handle the s